
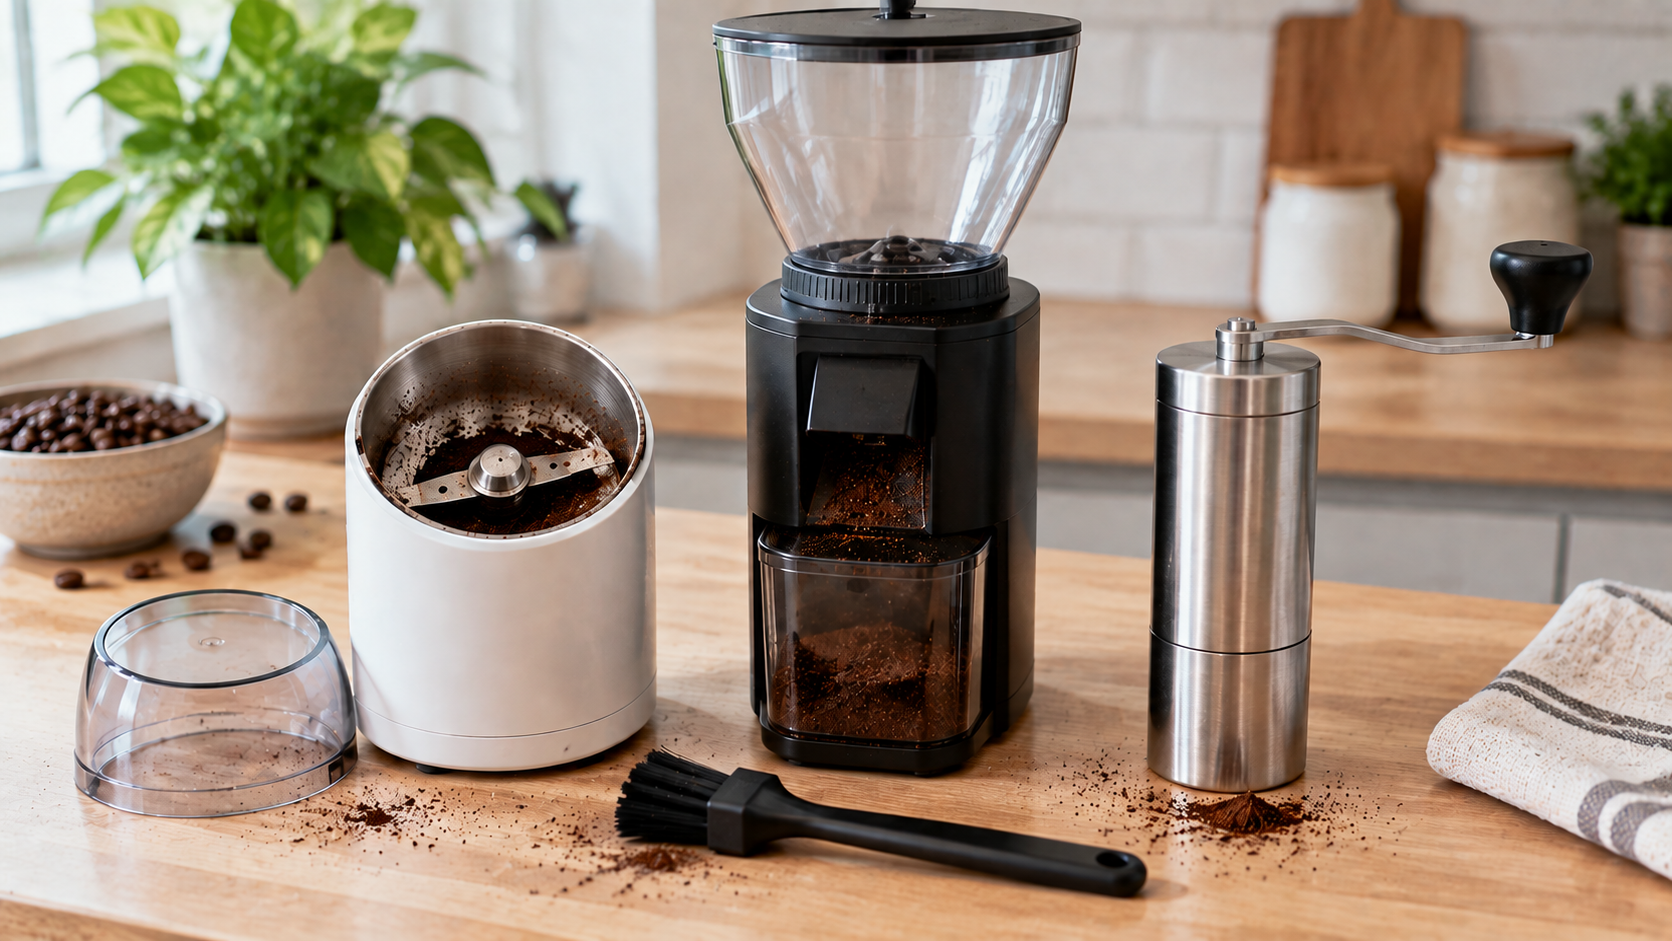
To clean a coffee grinder, unplug it, empty out the beans, brush old grounds away from the burrs or blade, and make sure every washable part is completely dry before reassembly. Regular cleaning matters because oils and fine grounds build up with every use and can make freshly ground coffee taste stale.
In this step-by-step guide, you’ll learn how to clean blade, burr, and hand grinders, which tools to use, how often to clean, and which mistakes can damage your grinder.
Quick Answer: How to Clean a Coffee Grinder
The right way to clean depends on the type of grinder, but every method starts the same way: unplug it if it’s electric, empty the beans, and brush out loose grounds.
- Blade grinder: Remove the top cover, tap out loose grounds, brush the blade and chamber, and wipe with a dry or slightly damp cloth if your manual allows. Use uncooked white rice only if the manufacturer approves it.
- Burr grinder: Take off the hopper and the removable burr, brush the burrs, grinding chamber, and chute, then reassemble and grind a small amount of coffee to discard. Skip rice unless your manual specifically allows it.
- Hand grinder: Hand grinders are easy to take apart and clean one part at a time. Brush every piece and wash only the parts the manufacturer lists as washable.
Brush out loose grounds regularly, deep clean based on how often you grind and which beans you use, and make sure washable parts are completely dry before reassembly.
Why Regular Grinder Cleaning Matters
Coffee beans contain natural oils. These oils stick to the parts of the grinder that touch the beans, and as they age they can oxidize and go rancid. Old oils and grounds then mix with fresh coffee and affect its flavor. A clean grinder also grinds more consistently, since old grounds aren’t getting in the way of the burrs or blade.
Signs You Need to Clean Your Coffee Grinder
- Your coffee tastes stale or sour, even with freshly roasted beans.
- You can still taste the previous coffee after switching beans or roasts.
- The grind looks less consistent than usual.
- It takes longer to grind the same dose.
- Grounds pack into the exit chute, or the grinder clogs.
- Beans stop flowing smoothly from an oily hopper.
- You can see an oily film or caked dust on the burrs, blade, or chamber walls.
Oily dark roasts and flavored beans tend to make these signs show up sooner.
What You Need to Clean a Coffee Grinder
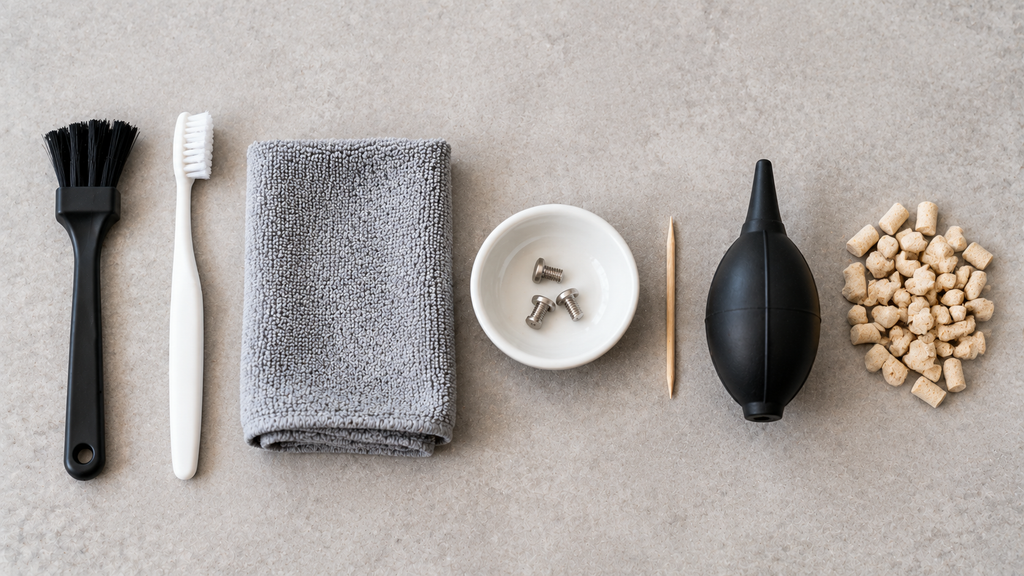
Gather these items before you start.
Essential Tools
- A stiff grinder cleaning brush or clean, dry toothbrush
- A dry, lint-free cloth or paper towels
- A small bowl or container for loose parts
A stiff brush or clean toothbrush can help you reach small spaces and remove coffee grounds from inside the machine.
Optional but Helpful
- Grinder cleaning tablets, such as Urnex Grindz, for compatible burr grinders
- Uncooked white rice for some blade grinders, if the manufacturer allows it
- A small handheld vacuum or low-pressure air blower
- A wooden toothpick or skewer for tight spaces
- Mild dish soap for washable hoppers and catch cups
If you use compressed air, choose a low-pressure option.
Do not use household spray cleaners, bleach, or abrasive cleaning pads on grinding surfaces. They may leave a residue or damage the parts.
Before You Start: Safety and Prep
Before you clean your coffee grinder, check your grinder’s manual so you know which parts can be removed and which can be washed. Disassembly and cleaning instructions vary by model.
Then:
- Unplug the grinder if it is electric, and never put an electric grinder in water.
- Empty the hopper or grinding chamber and remove any leftover beans.
- Prepare a clean, dry brush and cloth.
- Keep a small container nearby for screws and other small parts.
- Use a brush, not your fingers, around sharp blades.
- Don’t use metal tools on burrs, since they can scratch the grinding surfaces.
How to Clean a Blade Coffee Grinder
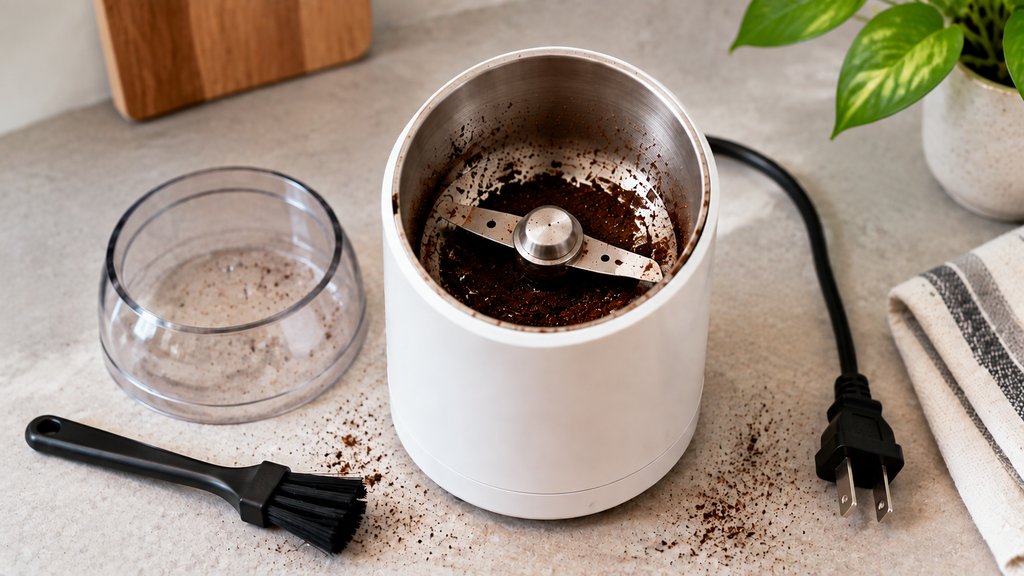
Blade grinders have a simple design. A spinning blade sits inside the grinding chamber, so they are usually quick and easy to clean.
Step 1: Unplug the Grinder
Always unplug the grinder before cleaning it. The blade can be sharp, so never put your hands near it while the grinder is connected to power.
Step 2: Remove Loose Coffee Grounds
Turn the grinder upside down over a trash can or container. Gently tap the sides to remove loose coffee grounds.
Remove as many grounds as possible before moving to the next step.
Step 3: Use Rice Only If Appropriate
If your manual allows it, add a small amount of uncooked white rice, pulse briefly, and throw away the rice powder. Rice can help loosen built-up grounds, but it doesn’t replace brushing and wiping. If your manual doesn’t mention rice, skip this step. See “When Rice Is and Isn’t a Good Idea” below.
Step 4: Brush the Chamber and Blade
Use a stiff, dry grinder brush to remove coffee particles from the blade and the corners of the chamber.
Pay attention to small spaces where fine grounds and oily residue can collect.
Never use your fingers to remove coffee grounds around the blade.
Step 5: Wipe the Interior
If the manufacturer allows it, use a slightly damp cloth to wipe the inside of the chamber, blade area, and lid.
Do not let water reach the motor or electrical parts.
Step 6: Dry Completely
Wipe the cleaned areas with a dry cloth. Let the grinder dry completely before using or storing it.
How to Clean a Burr Coffee Grinder
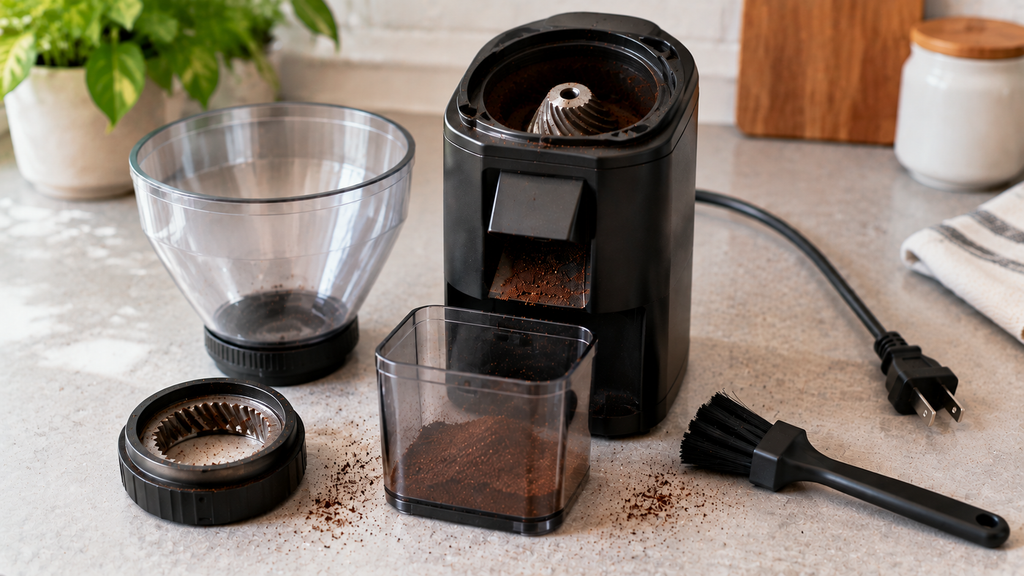
Burr grinders can hold coffee grounds around the burrs, grinding chamber, and exit chute. Because of this, they usually need more careful cleaning.
Step 1: Unplug and Remove the Hopper
Unplug the grinder before cleaning it. Then remove the hopper according to the manufacturer’s instructions.
Empty the hopper completely and remove any remaining beans.
If the hopper is washable, clean it with warm water and mild dish soap. Rinse it well and let it dry completely.
Step 2: Clear Retained Grounds
Beans often stay trapped above the burrs after you empty the hopper. If your manual includes this step, plug it back in and run the grinder briefly to grind through them, then unplug it again. Baratza, for example, includes grinding through remaining coffee in its routine cleaning steps. If your manual doesn’t mention it, or your grinder won’t start with the hopper removed, remove the beans by hand.
Keep your fingers away from the burr opening while it runs.
Step 3: Remove the Inner Burr
Many home burr grinders have a removable upper or inner burr.
Depending on the model, the burr may twist, lift, or unlock.
Check the owner’s manual before removing it.
Step 4: Brush Both Burrs
Use a stiff brush to clean the inner and outer burr.
Focus on the burr grooves, the teeth, and the narrow areas behind the burr, where compacted grounds, fine dust, and oily residue collect.
A wooden toothpick can help remove buildup from narrow spaces. Be careful not to scratch the burr surfaces.
Step 5: Clean the Grinding Chamber and Chute
After removing the burr, brush the grinding chamber and exit chute.
A small handheld vacuum or low-pressure air blower can help remove loose coffee grounds from hard-to-reach areas.
Avoid high-pressure air, which can push grounds deeper inside your grinder.
Step 6: Keep the Burrs Dry
Wipe the burrs and nearby surfaces with a dry cloth.
Water can cause rust or corrosion on some steel burrs. Do not get them wet unless the manufacturer says they are washable.
If your grinder has washable parts, follow the manufacturer’s instructions.
Step 7: Reassemble and Run a Purge Grind
Put the inner burr back in place. Make sure it is seated correctly.
Then attach the hopper and other removable parts.
Grind a small amount of coffee and throw it away. This is called a purge grind. It helps remove any remaining cleaning dust or residue.
Test the grind afterward. Removing and reinstalling the burr can sometimes change the grind setting.
How to Clean a Hand Coffee Grinder
Hand grinders are also called manual coffee grinders. They are easy to take apart, but they have several small parts.
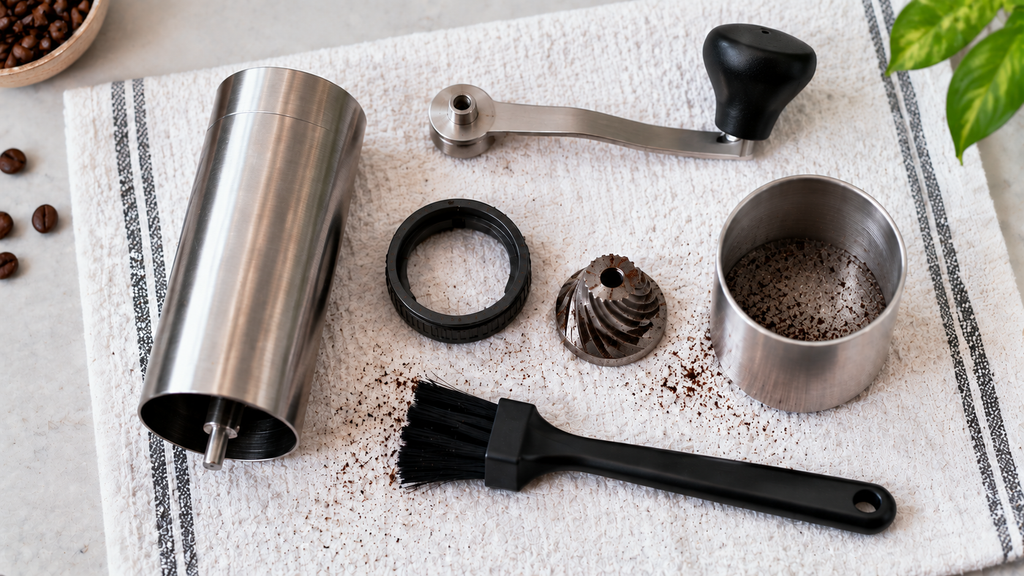
Step 1: Fully Disassemble
Remove the:
- Crank handle
- Adjustment mechanism
- Inner burr
- Shaft parts
- Catch cup
Follow the manufacturer’s instructions when taking the grinder apart.
Keep the small parts together so you do not lose them.
Step 2: Brush Every Part
Use a stiff, dry brush to clean:
- Inner burr
- Outer burr
- Grinding shaft
- Grinder body
- Adjustment area
- Catch cup
Remove all visible coffee grounds and coffee dust.
Step 3: Wash Non-Burr Parts If Needed
Some catch cups, lids, plastic parts, and silicone parts can be washed with mild soap and water.
Only wash burrs or metal parts if the manufacturer says they are washable.
Step 4: Dry Everything Completely
Place washable parts on a clean towel and let them dry completely.
Any moisture left inside the grinder can cause corrosion or other problems.
Step 5: Reassemble and Recalibrate
Put the grinder back together carefully.
Disassembly can sometimes change the adjustment setting. Grind a small amount of coffee and check the grind size.
Readjust it if needed.
How to Deep Clean a Coffee Grinder
A quick clean and a deep clean remove different things, so it helps to know which one your grinder needs.
| Cleaning Type | What It Removes | What You Do | When |
|---|---|---|---|
| Quick clean | Loose grounds and surface dust | Brush the burrs or blade, chamber, and chute | Regularly, as part of your routine |
| Deep clean | Coffee oils, compacted grounds, and residue in the burrs and chute | Remove the parts your manual allows, brush every surface, wash washable parts, and optionally use cleaning tablets | On a schedule based on use and roast level |
To deep clean, unplug the grinder and remove the hopper and any other parts the manufacturer allows. Brush the burrs or blade, grinding chamber, and chute, and wash only the washable parts. Let everything dry completely, reassemble, and grind a small amount of coffee to throw away before your next cup.
Coffee Grinder Cleaning Methods Compared
| Method | Best For | Advantages | Limitations |
|---|---|---|---|
| Dry brush and wipe | All grinder types | Fast and simple | May not remove heavy oil buildup |
| Uncooked white rice | Some blade grinders | Cheap and can loosen residue | Not recommended for most burr grinders |
| Grinder cleaning tablets | Compatible burr grinders | Made for grinder cleaning | Requires a purge grind |
| Full disassembly and brushing | Burr and hand grinders | Provides a deeper clean | Takes more time |
When Rice Is and Isn’t a Good Idea
Rice is a common home remedy, not a manufacturer standard. Some people pulse a small amount of uncooked white rice in a blade grinder to absorb oil and loosen stuck grounds.
Avoid rice when:
- Your manual doesn’t approve it.
- You have a burr grinder, since rice is harder than roasted coffee and can put extra stress on the burrs and motor.
- Your warranty terms exclude improper or unintended use. Check your specific grinder’s warranty before using rice.
What Grinder Cleaning Tablets Do
Grinder cleaning tablets are food-safe pellets, usually made from grains or other plant-based ingredients, that you grind like coffee. Urnex Grindz, a widely used example, is designed to remove coffee oils and particles from burrs and casings without taking the grinder apart. Tablets are most useful between full disassembly cleans or if you grind a lot of dark roast. They don’t replace brushing, and not every grinder needs them.
- Use the right amount. Doses vary by grinder. Urnex lists different amounts for espresso grinders and larger shop grinders.
- Purge thoroughly. Urnex’s home instructions call for grinding and discarding about 70 grams of coffee beans afterward, or until no tablet specks remain.
- Check the machine type. Urnex says not to use Grindz in the built-in grinders of super-automatic coffee machines.
How Often Should You Clean a Coffee Grinder?
The right cleaning schedule depends on how often you use your grinder, the type of beans you use, and the grinder’s design.
| Usage | Suggested Cleaning Frequency |
|---|---|
| Occasional use | Every 1 to 2 months |
| Daily home use | Every 2 to 4 weeks |
| Heavy daily use | About once a week |
| Oily dark-roast beans | Clean more often |
| Flavored coffee beans | Clean more often, especially before switching back to regular beans |
| Cafe or commercial use | Weekly or according to the manufacturer’s schedule |
Treat these as general starting points, not fixed rules, and check your manufacturer’s instructions. Baratza, for example, suggests routine cleaning of its grinders every 4 to 6 weeks, with more frequent cleaning for dark roasts because they leave more oil behind. A quick brush-out can be done much more often than a full deep clean.
A few situations call for adjusting the schedule:
- Home coffee enthusiasts: If you grind coffee every morning with a conical burr grinder, a quick brush after use and a deep clean for your grinder every few weeks is a practical routine.
- Shared office grinders: Different beans and roast levels pass through the same burrs, so regular cleaning helps limit flavor carryover.
- Cafes: Commercial grinders process far more coffee. Baristas should follow the manufacturer’s maintenance schedule, brush the chute regularly, and deep clean at set intervals.
Common Problems After Cleaning
Coffee Still Tastes Stale After Cleaning
Possible cause: Rice or cleaning tablet residue may still be in the grinder, or old grounds may remain in the chute.
What to do: Grind and throw away a small dose of coffee, then taste again. After cleaning tablets, purge with the amount the tablet maker recommends. If the taste still doesn’t improve, check the chute for packed grounds.
Grind Size Suddenly Changed
Possible cause: An inner burr that’s not seated correctly, or a grind setting that moved during reassembly.
What to do: Remove and reseat the burr. Check the adjustment mechanism and test the grinder with a small amount of coffee.
Excessive Static After Cleaning
Possible cause: Static depends on the grinder, the beans, and humidity. A freshly cleaned grinder may behave a little differently for the first few doses, and light roasts tend to produce more static than dark roasts.
What to do: Grind a few doses and see whether it settles. If static continues, see “How Do You Remove Static From a Grinder?” in the FAQ below.
Grinder Sounds Louder or Rougher
Possible cause: A small part may be missing or in the wrong position.
This could include a gasket, spring, or alignment part.
What to do: Check the grinder again and compare the parts with the diagram in the owner’s manual.
Common Coffee Grinder Cleaning Mistakes
Using Rice in a Burr Grinder
Rice is harder than roasted coffee and can put extra stress on the burrs or motor. Don’t use it in a burr grinder unless your manual approves it.
Washing Burrs With Water Without Checking the Manual
Rinsing steel burrs that aren’t made to be washed can lead to rust. Brush them dry instead, and check the manual before any part touches water.
Skipping the Purge Grind After Cleaning
Cleaning can leave fine dust or tablet residue inside the grinder.
Grinding and throwing away a small amount of coffee helps remove this residue before you make your next cup.
Reassembling While Parts Are Still Damp
Moisture inside the grinder can cause corrosion and other problems.
Make sure all washable parts are completely dry before putting the grinder back together.
Forgetting the Chute and Dosing Area
The exit chute collects old grounds and fine dust, which can become compacted if you use the grinder often. Brush it out during every deep clean.
Using Household Cleaners on Grinding Surfaces
Avoid spray cleaners, bleach, and abrasive products on grinding surfaces.
Use a dry brush and manufacturer-approved cleaning products instead.
Best Coffee Grinder Maintenance Practices
Good grinder maintenance does not have to be difficult.
- Brush out retained grounds regularly. A quick brush-out prevents buildup, while a deep clean removes oils and residue.
- Read your grinder’s manual. Cleaning steps differ by model.
- Empty the hopper completely between sessions. This reduces how long beans sit in the hopper.
- Use a purpose-made grinder brush. Its bristles can reach small spaces.
- Store the grinder in a cool, dry place. This helps reduce moisture and residue.
- Set a cleaning reminder. A regular schedule makes grinder maintenance easier.
- Replace worn burrs when needed. Burr life depends on the grinder, burr material, coffee volume, and roast level. Check the manufacturer’s recommended replacement time.
Frequently Asked Questions About Cleaning a Coffee Grinder
Can You Use Rice to Clean a Coffee Grinder?
Rice is sometimes used in blade grinders, but only if the manufacturer allows it. Avoid it in burr grinders unless your manual specifically recommends it, because it can strain the burrs and motor, and warranty terms may restrict improper or unintended use.
How Do You Clean a Coffee Grinder Without Rice?
You can clean a coffee grinder without rice.
First, unplug the grinder and remove loose grounds. Then use a clean, dry grinder brush to clean the burrs, blade, grinding chamber, and chute.
For a deeper clean, you can use grinder cleaning tablets if your grinder supports them.
Clean washable parts separately and make sure everything is completely dry before putting the grinder back together.
Can You Wash Coffee Grinder Burrs With Water?
Most steel burrs should stay dry unless the manufacturer says they can be washed.
Water can cause corrosion if the burrs are not designed to be washed.
Some grinder parts may be washable, so always check the manufacturer’s instructions first.
Can You Use Soap to Clean a Coffee Grinder?
Use mild dish soap only on removable parts that the manufacturer says are washable.
These may include some hoppers and catch cups.
Avoid using soap on burrs, blades, or internal grinding surfaces unless the manufacturer specifically recommends it.
Rinse washable parts well and let them dry completely.
Do Grinder Cleaning Tablets Actually Work?
They can help. Grinder cleaning tablets are designed to absorb coffee oils and loosen particles from burrs and casings without full disassembly. They don’t replace brushing, and they aren’t suitable for every machine.
Check both the tablet and grinder instructions before using them, and purge with coffee afterward until no tablet residue remains.
Will Cleaning Change My Grind Setting?
It can. Removing and reinstalling the inner burr can shift the setting, so grind a small amount after cleaning, check the result, and adjust if needed.
What Can You Use If You Don’t Have a Grinder Brush?
A clean, dry toothbrush can work as an alternative.
You can also use a dry cloth or wooden toothpick for tight spaces.
Avoid metal tools because they can scratch burrs and other grinding surfaces.
Can I Put Grinder Parts in the Dishwasher?
Only put a grinder part in the dishwasher if the manufacturer says it is dishwasher safe.
Some plastic hoppers and catch cups may be safe to wash this way.
However, burrs, motor-connected parts, and other sensitive components should not go in the dishwasher unless the manufacturer approves it.
Why Does Coffee Taste Bad Even With Fresh Beans?
Old grounds and oils can stay inside the grinder.
These old grounds can mix with your fresh beans and affect the taste of your coffee.
If your coffee suddenly tastes stale, cleaning the grinder is a good first step.
How Do You Clean a Grinder Used for Spices?
If you use your coffee grinder to grind some spices, remove as much spice residue as possible before using the grinder for coffee.
For a blade grinder, follow the manufacturer’s cleaning method and use a brush and cloth to remove residue.
For a burr grinder, disassemble it and brush the accessible parts according to the manufacturer’s instructions. Also review your warranty, since some manufacturers exclude damage caused by improper or unintended use.
If you often grind coffee and spices, using separate grinders is the best way to reduce flavor carryover.
How Do You Remove Static From a Grinder?
Static depends on the grinder, the beans, humidity, and roast level, with lighter roasts often producing more of it. After cleaning, grind a few doses and see whether it settles.
If static continues, try the Ross Droplet Technique (RDT): add a tiny amount of water to the beans, such as one drop or a light spritz, and stir before grinding. Check your manual first, since adding moisture isn’t appropriate for every grinder.
Conclusion
A clean coffee grinder makes better coffee, and keeping it that way only takes a few minutes of routine care. Regular brushing and deep cleaning keep your grinder working well.
Brush out loose grounds often, use the cleaning method that matches your grinder type, and deep clean on a schedule that fits how much you grind and which beans you use. Check the manufacturer’s instructions before washing parts, using rice or tablets, or taking the grinder apart, and make sure every part is dry before reassembly.
Written by Towshin Farjana
Towshin is a contributing writer who creates practical, easy-to-follow guides on home and kitchen topics. This guide is based on manufacturer guidance and published sources.
Last updated: September 17, 2026
Sources:
